
Hey Guys! Before I left for Central America, I collaborated with one of my old friends Ryan Martin on this blog. Ryan is a coffee expert and takes his coffee pretty seriously. After an evening of making and drinking a TON of coffee, taking photos, and then writing and editing the process, we bring you this mini tutorial on how to brew your own perfect cup of joe. We hope you like it!

All photographs by Meagan Kathleen Photography.
Before I get into the techniques and details of manual brewing, there are two things that will radically change the taste of your coffee regardless of how bad you mess up or get frustrated with the process. These two things include brewing with fresh roasted and fresh ground coffee beans. While other factors like water temperature and ratios (more on that later) will create variations in your cup, I believe those two things will have the greatest impact. Here’s why.
Fresh Roasted
Think about this for a moment: How long do you think that bag of roasted coffee sat on the grocery store shelves before you bought it? How long do you think it sat in their warehouse before putting it on the shelves? Even further, how long do you think it sat in the warehouse of the coffee company before they shipped it to the grocery store? And so on. My guess is about a few weeks for every stage, resulting in a few months since the time it was roasted. That is just way too long. I am going to say something that will probably make you a little uncomfortable - you might even spit out a bit of that store-bought “coffee” that you’re drinking. Ready?
Roasted coffee has an expiration date of about 14 days.
That’s 2 weeks.
Not months.
The coffee bean is the seed of the coffee cherry that grows on millions of trees around the world. And it is quite sensitive. After the bean has been picked from the cherry, it is considered “green coffee.” This green coffee exasperates its freshness at a much slower rate than roasted coffee. It can go over a year before going stale. However, to get it to your cup, it has to be roasted.

Upon roasting, the coffee bean is heated to extremely high temperatures, eventually “cracking” and beginning the activation of the many flavors inside this little seed of wonder. But as soon as this process begins, the clocks starts ticking. Even just a several days after roast, your coffee will taste different, slowly losing the nuances of flavor. So imagine how much more delicious your coffee would be if you brewed much closer to the time it was roasted! Without beating a dead horse, I am sure you understand what I am saying here. Get fresh roasted! The two most convenient ways of getting fresh coffee is through your local shop that roasts in house (or gets beans from another shop that does) or through roasters that ship their fresh beans to your doorstep. Some of my favorite roasters are Ironsmith Coffee Roasters, Rose Park Coffee Roasters, Happy Mug, and Kean Coffee. All of them have different styles of roasting, but are unique in their own ways. I definitely recommend checking them out or doing some searching yourself for what you love best. Some other popular choices that I have yet to experience include Intelligentsia, Chromatic Coffee, and Verve.
Personal preferences: Light-medium roasted, single origin. I prefer a single origin out of respect for the coffee farmers and singularity of flavor. Single origin means that the beans came from only one farm, not multiple (which is what you typically find in a blend). This means that the hard work of the farmer is not thrown in with another farmer’s beans. If I were a coffee farmer, I would want to be the only coffee in someone’s cup - not paired up with some rando in another country! Secondly, coffees from different regions and countries have very distinct tastes. When you roast them together, you are bound to get quite the mash-up flavors. I am not a huge fan of that. Anyway, that is personal opinion. You need to find what YOU love and don’t let anyone else tell you otherwise. Flavors(or “notes”) that I tend to really love include berries, stone fruit, floral/tea, and butter. It may be a shock to you, but those are all very common notes to find in coffee when it is taken care of properly. Makes you a little excited doesn’t it?
Fresh Ground
Okay, now for the second most important thing - and I will try to keep this short because at this point you’ve probably caught my drift about the whole freshness thing. Fresh ground beans.
Remember how I said coffee beans are sensitive? Well ground coffee beans are even more sensitive. Based on the grind size of your coffee, your time window for ground coffee can be anywhere from 15 seconds to 15 minutes (even that is a little long). When you grind coffee, you have begun exposing many of the volatile flavors that are ready to be dissolved into your cup. The more time that passes between the grind and the brew, the less flavor it will have. So, to get the most of that coffee goodness onto your excited little tongue, grind right before brewing! Actually, one more important thing regarding grinding - don’t take this one as seriously until you’re ready to really step up your game.
Consistent grinds are also extremely important. Every various size of ground, from fine to medium to coarse and everything in between, has a different potential for flavor. Consistency matters because you don’t want several different grind sizes emitting several different flavors into your cup - it’s not as yummy as it sounds. The reason I say not to worry about this just yet is because entry level burr grinders (that give you great consistency versus blade grinders) start at $100. However, there is a great solution to this if you’re not ready to take out a small loan for coffee stuff. The Hario hand grinders are affordable and functional options for your strive for the best cup possible - and they use burrs!
Okay, enough rambling.
Time to teach you how to make great coffee in the comfort of your home.
V60 Pour Over
Here’s what you need:
Coffee beans
Grinder
Filtered/bottled water
Kettle (preferably gooseneck)
Food scale that can measure to the gram
Food thermometer
Stopwatch (use your smartphone)
Hario V60 cone and filters
Something to brew the coffee into
Your favorite mug!

Preheat the Water.
After my introductory discussion you can probably come to the conclusion that coffee has… wait for it… flavor. Whoa, revelatory isn’t it? Except you’re not going to taste any of those flavors just staring at it. Time to extract them! You do this by dissolving the coffee grounds into water. This is where your filtered/bottled water, kettle, and food thermometer come into play.
We use filtered or bottled water for the cleanest cup possible and it’s as simple as that. Put the water in the kettle and use the food thermometer to heat it to a temperature between 195 and 205 degrees Fahrenheit. This range of temperature represents the heat at which the water best extracts those volatile flavors in your grounds. As for the kettle, a gooseneck spout is best because it gives you the best control when it comes to finally brewing your coffee. Control is crucial to how much speed, accuracy, and pressure you put on the grounds when brewing.

Weigh the Coffee.
Get your food scale and coffee beans out! Weighing the beans is important to the subject of water-to-coffee ratio and consistency. Being able to know exactly how much coffee you’re going to use will help you stay consistent with your future brews! For the sake of this method, go ahead and weigh out 22g of coffee beans.
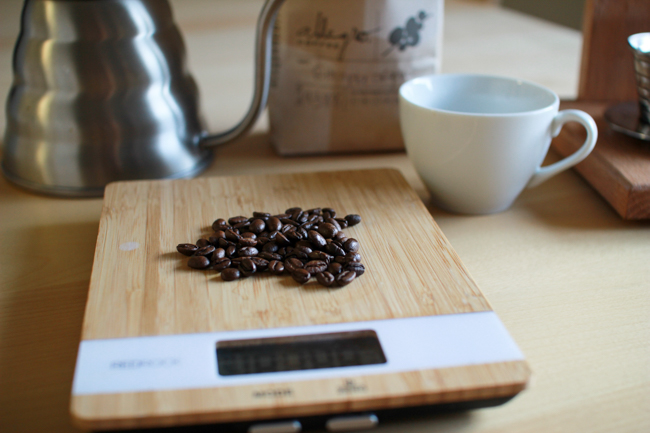
Grind the Coffee.
The grinding should happen either right before or after the water is finished heating up. Remember, you want to grind right before brewing. The grind should be about a fine-medium size. This is close to the same particle size as table salt. Like I mentioned earlier, a burr grinder is best for this because it gives you great consistency in your grind, resulting in each particle being the same size. So if you can get your hands on an automatic or hand-operated burr grinder, that would be best. However, if you have a blade grinder, don’t fret, just try to get your grind as close to the fine-medium mark as possible. You can shake the grinder a bit while it’s on to even it out. Remember: freshness of grind is most important here.


Setup the Brew.
Grab your scale, V60 cone and filters, ground coffee, and a vessel to brew the coffee into (unless your mug is big enough). Set your vessel on top of the scale, your V60 on top of that, and a filter inside the cone. Take your hot water and run it through the empty filter and into the vessel, eliminating the particles that create a paper taste that would otherwise make it into your coffee. Pour the “paper water” out. California’s in a drought, so be modest. Just kidding. Sort of. Next, pour your ground coffee into the filter, shaking the cone to level out the grounds. Now turn on your scale, making sure that it reads “0g.” You’re ready!


“Bloom” the Coffee.
The “bloom” is another term for pre-infusing the coffee grounds. What this does is removes much of the carbon dioxide and trapped gases in the beans - a natural consequence of roasting. To do this, add about 35-40g of water to the grounds, making sure to wet all of them. Keep an eye on your scale while you do this! Once you have hit 35-40g, let this preinfusion happen for about 30-45 seconds. Use the stopwatch on your phone for this. Or an actual stopwatch. You will begin to see the coffee grounds rise and bubble. This is the physical manifestation of those gases escaping from your coffee. The reason we do this is so that when it comes time to finally brew the coffee, your brew is not interrupted and thrown off by bursting pockets of air. We want as even as an extraction as possible.


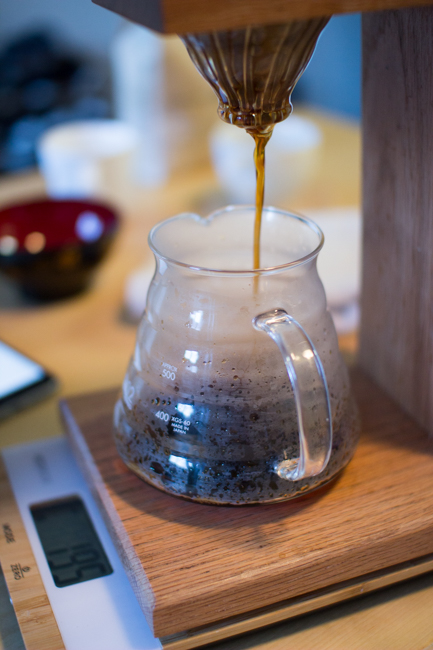
Brew the Coffee… Finally.
Time to finish the process. Your stopwatch should still be running. After the bloom has finished, you will begin pouring water slowly and steadily in concentric circles, starting in the middle of the cone and going outwards, then bringing it back to the middle. Make sure to keep your pour steady and don’t go too fast! Remember, we want an even extraction. You should be able to pour the water at a rate that keeps the flow rate of extraction consistent. Easiest is to pick a spot near the top of the filter and pour at a rate that keeps the coffee there until you reach the final desired amount. For this method, go ahead and do this until you have reached about 350g total - this includes the amount you used for bloom, do not tare after the bloom. Don’t forget to keep an eye on the scale while you do this! It’s important that you do not add too much water.
We are using 350g of water for our 22g of coffee based on a general consensus that a ratio of 15-17:1 (grams of water to grams of coffee) is ideal for most brewing methods. Reason being, you do not want to either under-extract or over-extract the coffee grounds. Believe me, scientific observations have been done to find this ratio the most rewarding. In fact, the “golden ratio” is said to be 16.66:1. Quite specific. However, it is still very subjective and it’ll take a lot of tests for you to find what you like most! Anyway, once you have reached 350g, stop pouring water and let the water fully drain through to your vessel. The time should read about 3 minutes. If it’s longer than 3 minutes, consider coarsening up your grind a little bit as this will result in shorter brewing times.

Enjoy.
After all your thoughtful preparation, your coffee is finally ready. Give your vessel a swirl and pour it into your mug. Wait a few minutes for it to cool down. Much of the bitterness will burn off, giving you a more a flavorful experience. Sip. Smile. Give yourself a high five because you’re awesome.

Quick Guide.
Here is an extremely shortened version of what I just taught you. That way you can keep referring back to just this now that you have the deeper knowledge of each process. Also, underneath I will include some suggestions on great, affordable gear to get you started!
Preheat water to 195-205F
Weigh 22g of coffee
Grind to fine-medium (like table salt)
Setup brewing station
Pre-wet filter
Add coffee grounds
Bloom: add 35-40g water for 30-45 seconds
Brew: add water in concentric circles until 350g - stopwatch should read about 3 minutes
Serve
Sip
Smile


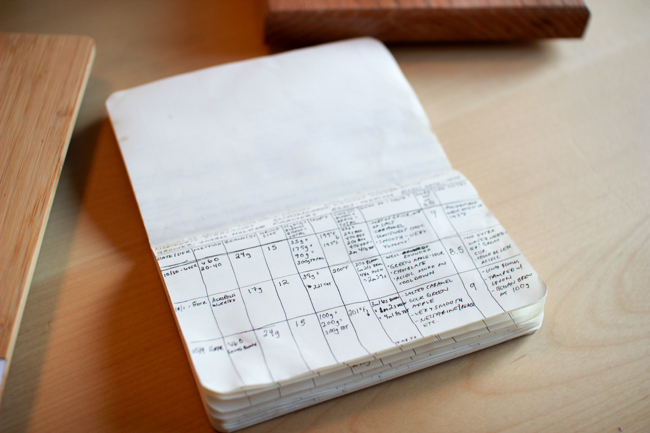
Here is my coffee notebook. In this, I record every detail of every brew to get a more scientific understanding of the craft. Documenting each variable helps me see what needs to be repeated or what can be changed in future brews. If a coffee tastes a certain way, I can almost always attribute it to some variable easily referred to somewhere in my notebook.